10 Audio Editing with Audacity: Creating a Podcast Episode with Multi-Track Main Content and More Effects
In the last chapter, you learned how to use the Audacity audio editor to take raw recordings and use them to created a podcast episode with intro music, main content, a spoken outro, and outro music. In each episode, the main content consisted of multiple speakers that were all included within a single track, and each section was separate from every other section.
Podcast structure
The structure of the podcast episode in this tutorial (which is based on Season 3, Episode 3 of the Some Stutter, Luh! podcast) will be similar to that of the episode from last chapter in that it will include main content, intro and outro music, and a spoken intro and spoken outro. However, there will also be some differences.
This podcast episode will include a preview quote, which is a section of audio from later in the episode that has been copied to the beginning to give the listener a glimpse of what the episode will be about.
Also, while the last chapter involved episodes with separate, non-overlapping sections, this chapter will show you how to create episodes with overlapping tracks. Specifically, the intro music will overlap with the preview quote and the beginning of the main content, and the outro music will overlap with the end of the main content and with the spoken outro.
Finally, the main content will not be a single track, but rather split among two different tracks: one containing the interviewer’s audio, and one containing the interviewee’s audio.
Multi-track recordings
In the last chapter, the recordings of all the speakers in the main content were part of a single track. Some types of videoconferencing software will output multi-speaker audio as a single audio files.
However, depending on the platform, another possibility is to output the audio of each speaker as a separate file. This has the advantage that it gives you more fine-grained control over the audio. For example, if there is a loud background noise in one of the speaker’s recordings while a different speaker is talking, you can remove that loud background noise without affecting the audio of the person who is speaking, whereas if all the speakers were part of a single track, then there might not be any option but to leave the loud noise in.
Learning goals
In this chapter, you will learn how to:
- Edit episodes where each speaker has a separate track
- Add a preview quote to the beginning of an episode
- Use the Auto Duck effect to push music to the background
- Use the Split effect to mark start times of sections in reusable templates to ensure consistency between episodes
- Use the Loudness Normalization effect so your tracks have roughly the same level of loudness
Tutorial: Editing a podcast
Importing audio files
In order to start editing the episode, download the following audio files (adapted from Season 3, Episode 3 of the Some Stutter, Luh! podcast) and import them into Audacity:
In Audacity, your project will look something like the following image, where there are four tracks that all start at the very beginning of the project:
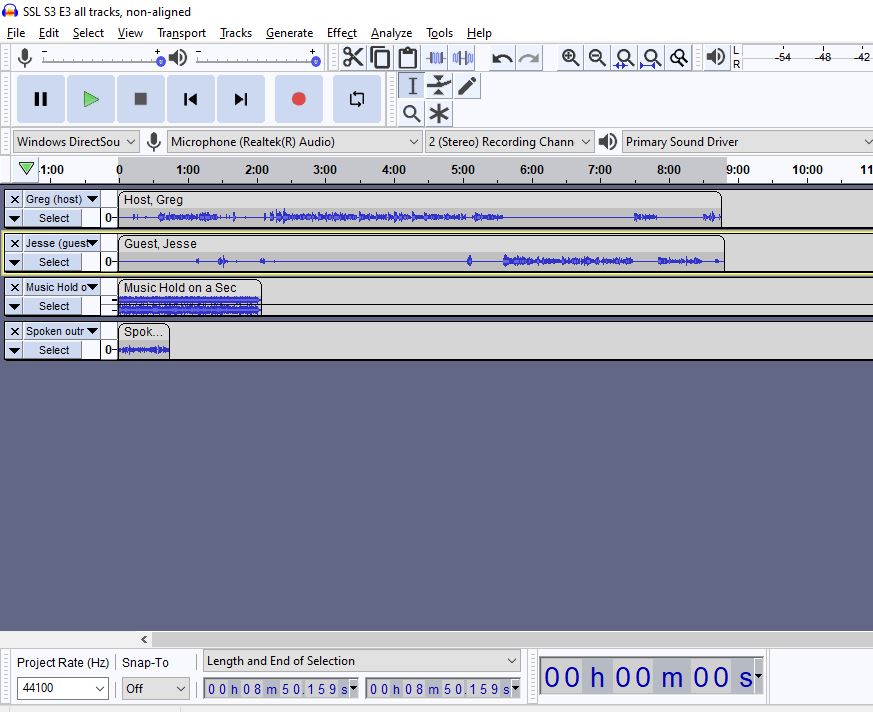
At this stage of the editing process, the tracks clash together. To avoid this, we have to align them.
Aligning the tracks
In the last chapter, we had the intro music play on its own for about 20 seconds and then fade out. In this chapter, the intro music will serve as background music for a roughly 20-second-long preview quote, the intro music will additionally fade out after the main content has started rather than before. As a result, we will have the intro music last about 35 seconds so that it is long enough to encompass both the preview quote and part of the main content. We will also have the main content start about 30 seconds into the episode so that there is enough space at the beginning of the episode for the preview quote and 5-second spaces between (a) the beginning of the episode and the preview quote, and (b) the end of the preview quote and the beginning of the main content.
First, let’s move the tracks of the host and guest. In order to do this while making sure they are still exactly aligned with each other, we can use the Sync-Lock Tracks function, which ensures that when one track that is part of a sync-locked group moves, the others move by the same amount and in the same direction. However, by default, the function sync-locks all of the tracks in the project, whereas we only want to sync-lock the tracks of the host and guest. To sync-lock only certain tracks, we can add a label track to separate the tracks we want to sync-lock from those we don’t want sync-locked.
Make sure that the tracks of the guest and host are next to each other and that the other tracks are all either below them or above them. If the tracks are not next to each other and/or are not at the top or bottom of the project, move them so that they are.
Next, we need to add a label track and move it so that it separates the tracks of the guest and host from the rest of the tracks. To create a label track, go to the Tracks menu, then to Add New Label > Track.
Now, move the label track so that it is between the main content tracks (the host’s track and the guest’s track) and the rest of the tracks:
- Mouse
- Press the Alt key
- While holding Alt, select the control panel of the label track and drag it up until it separates the main-content tracks from the non-main-content tracks (that is, the tracks on one side of the label track should be the host and guest’s tracks, and the tracks on the other side should be the rest of the tracks)
- Keyboard
- Press Shift+M to open the menu of the track control panel
- Press Move Track Up
- Repeat steps 1 and 2 until the label track is between the main content tracks (the host’s track and the guest’s track) and the non-main-content tracks (which are the rest of the tracks)
After this, go to the Tracks menu and select Sync-Lock Tracks (on/off) to turn the sync-lock function on.
Now, we will move the main-content tracks to the 30-second mark in the project so that there is a gap at the beginning big enough to insert a preview quote:
- Mouse:
- Select one of the main-content tracks (the host’s track or the guest’s track)
- Drag the track to the right until the beginning of it is at the 30-second mark (since the tracks are now sync-locked, the other main-content track will move as well)
- Keyboard:
- Press Ctrl+Shift+A or Cmd+Shift+A to deselect all tracks (alternatively, go to the Select menu and press None)
- Highlight the host’s track using the relevant arrow key (Up or Down)
- Press Enter to select the Host’s track
- Highlight the guest’s track using the relevant arrow key (Up or Down)
- Press Enter to select the guest’s track
- Press J to move the cursor to the beginning of the track if it isn’t at the beginning already
- Press Shift+K to select the entire content of the guest’s track and the host’s track
- Press Ctrl+X (or Cmd+X) to cut the content of the main content tracks
- Press [ (the left bracket key) to open the Set Left Selection Boundary dialog
- Press the Left arrow key four times to move the selection to the tens-of-seconds place in the dialog
- Press 3 to change the time in the dialog to 30 seconds
- Press Enter to save the time
- Press Ctrl+V (or Cmd+V) to paste the main content tracks back into the tracks at the 30-second mark
Go to Tracks > Sync-Lock Tracks (on/off) to turn off the sync-lock feature.
Also, you can delete the label track, since it is no longer necessary. To do so:
- Mouse:
- Click on the “x” button in the track control panel of the label track, or click on the Tracks menu and then on Remove Tracks
- Keyboard:
- Press Ctrl+Shift+A (or Cmd+Shift+A) to deselect all tracks
- Highlight the label track using the relevant arrow key (Up or Down)
- Press Enter to select the label track
- Open the Tracks menu
- Select Remove Tracks
The next step is to move the spoken outro so that it starts at the end of the main content:
- Mouse:
- Click and hold the handle bar of the clip in the spoken outro track
- While continuing to hold the handle bar, drag the spoken outro clip to the right until the beginning of it is aligned with the end of the main content (a yellow line will appear when the two are aligned)
- Keyboard:
- Press Ctrl+Shift+A (or Cmd+Shift+A) to deselect all tracks, or go to the Select menu and select None
- Highlight the spoken outro track using the relevant arrow key (Up or Down)
- Press Enter to select the spoken outro track
- Press J to move the cursor to the beginning of the spoken outro track
- Press Shift+K to select everything in the spoken outro track that is to the right of the current cursor position
- Press Ctrl+X (or Cmd+X) to cut the clip in the spoken outro track
- Press Ctrl+Shift+A (or Cmd+Shift+A) to deselect all tracks, or go to the Select menu and select None
- Highlight the guest’s track or the host’s track using the relevant arrow key (Up or Down)
- Press Enter to select the track
- Press K to move the cursor position to the end of the track (this cursor position will be preserved when we re-select the spoken outro track)
- Press Ctrl+Shift+A (or Cmd+Shift+A) to deselect all tracks, or go to the Select menu and select None
- Highlight the spoken outro track
- Press Enter to select the spoken outro track
- Press Ctrl+V (or Cmd+V) to paste the spoken outro
The track is still missing outro music. To add outro music, we will duplicate the clip in the intro music track and move it to a new outro music track. To do this:
- Mouse:
- Go to the Tracks menu, then to Add New > Mono Track
- (Optional) To rename the track, click on the menu bar next to the “x” symbol in its track control panel and click on “Name”; type the desired name and click OK
- Click and hold the clip handle bar of the clip in the intro music track
- While continuing to hold the clip handle bar, drag the clip in the intro music track down to the new outro music track you created in step 1, and then to the right until the beginning of the clip is positioned a few seconds before the end of the main content
- Go to the Tracks menu, then to Add New > Mono Track
- Keyboard:
- If the Full set of shortcuts is enabled, press Ctrl+Shift+N (or Cmd+Shift+N) to create a new mono track; otherwise, go to the Tracks menu, then to Add New > Mono Track
- (Optional) To rename the track, press Shift+M to open the track’s menu and select “Name”; type the desired name (e.g. “Outro music”) and press Enter
- Press Ctrl+Shift+A (Cmd+Shift+A) to deselect all tracks, or go to the Select menu and select None
- Highlight the intro music track using the relevant arrow key (Up or Down)
- Press Enter to select the intro music track
- Press J to move the cursor to the beginning of the track
- Press Shift+K to select the content of the intro music track that is to the right of the current cursor position (in this case, this will select the single clip of audio that is in the track)
- Press Ctrl+C (or Cmd+C) to copy the clip
- Press Ctrl+Shift+A (or Cmd+Shift+A) to deselect all tracks, or go to the Select menu and select None
- Highlight the outro music track using the relevant arrow key (Up or Down)
- Press Enter to select the outro music track
- Press Ctrl+V (or Cmd+V) to paste the music intro into the outro music track
- If the Full set of shortcuts is enabled, press Ctrl+Shift+N (or Cmd+Shift+N) to create a new mono track; otherwise, go to the Tracks menu, then to Add New > Mono Track
Next, we need to align the outro music so that it starts a few seconds (in this case, about 6 seconds) before the end of the main content. To do this:
- Mouse:
- Click the end of the clip in one of the main content tracks (the host’s track or the guest’s track)
- A yellow line will show up when the mouse is hovering over the end of the clip
- Press the Comma key 6 times to move the cursor back 6 seconds
- Go to the Edit menu, then to Clip Boundaries > Split to create a marker that can be used to align the outro music
- Click and hold the handle bar of the clip in the outro music track
- Drag the clip to the right until the beginning of it is aligned with the marker you created in Step 3 (a yellow line will appear when this is the case)
- Click the end of the clip in one of the main content tracks (the host’s track or the guest’s track)
- Keyboard:
- Press Ctrl+Shift+A (Cmd+Shift+A) to deselect all tracks, or go to the Select menu and select None
- Highlight the outro music track
- Press Enter to select the outro music track
- Press J to move the cursor to the beginning of the outro music track
- Press Shift+K (Cmd+Shift+A) to select the content of the outro music track that is to the right of the current cursor position (in this case, this will select the single clip of audio that is in the track)
- Press Ctrl+X (or Cmd+X) to cut the outro music clip
- Press Ctrl+Shift+A (Cmd+Shift+A) to deselect all tracks, or go to the Select menu and select None
- Highlight one of the main content tracks (the host’s track or the guest’s track) using the relevant arrow key (Up or Down)
- Press Enter to select the track
- Press K to move the cursor to the end of the track
- Press the Comma key 6 times to move the cursor back 6 seconds
- Press Ctrl+Shift+A (Cmd+Shift+A) to deselect all tracks, or go to the Select menu and select None
- Highlight the outro music track using the relevant arrow key (Up or Down)
- Press Enter to select the outro music track
- Press Ctrl+V (or Cmd+V) to paste the music into the outro music track
Shortening the intro music
The intro music currently lasts about two minutes, which is a bit long, since it continues for some time after the main content. While we could have the music continue playing during the main content until the music reaches the end of the piece, it is more usual to have intro music stop shortly after the beginning of the main content. To do this, we can shorten the intro music as follows:
- Mouse:
- Click a point in the intro music track at the 35-second mark
- Go to Edit > Clip Boundaries > Split to split the intro music clip into two clips
- Click the handle bar of the second of the two clips
- Press Ctrl+K (or Cmd+K) to delete it
- Keyboard:
- Press Ctrl+Shift+A (Cmd+Shift+A) to deselect all tracks, or go to the Select menu and select None
- Highlight the intro music track
- Press Enter to select the intro music track
- Press ] (the right bracket key) to open the Set Right Boundary Selection dialog
- Press the Left arrow key 4 times to go to the tens-of-seconds position
- Type “35 000” (without quotes or spaces) and press Enter to move the cursor to the 35-second position
- Press Ctrl+I (or Cmd+I) to split the clip into two clips
- Press Shift+K to select the second clip
- Press Ctrl+K (or Cmd+K) to delete the second clip
The intro music has now been shortened to a length where it is short enough that it stops soon after the beginning of the main content and long enough that it lasts longer than a preview quote.
Now, almost all of the tracks are aligned. The next step is to find a preview quote to use at the beginning of the episode.
Choosing a preview quote
The process of selecting a snippet of audio to use as a preview quote involves listening to the main content to see which part of it would be a good snapshot of what the episode (or at least a part of it) is about.
In this case, we will be taking the following snippet of the guest’s answer: “So you can study lots of things as a psycholinguist. You can study how infants acquire language. You can study how people learn a language later on in life. You can study production (right?) all the, you know, mechanisms that go into articulating and executing speech.”
Listen to the guest’s answer until you reach that part of the interview, and select the part of the guest’s track that contains that extract. Then, press Ctrl+C (or Cmd+C) to copy it, and go to the Tracks menu and then to Add New > Mono Track. If you want, you can rename this new track to “Preview quote.” Select a point in this new track five seconds after the beginning of the track and press Ctrl+V (or Cmd+V) to paste the preview quote.
Alternatively, to copy and paste the preview quote using a keyboard:
- Listen to the interview until you reach the part of the guest’s answer that starts with “So you can study lots of things” (this is at about the 6:35 mark)
- Once you reach that part of the answer, press the P key to pause the playback
- Press [ (the left bracket key) to move the cursor position to the place where the playback was paused
- Press Space to stop the playback
- You can check the exact point at which the audio starts by pressing Space to play the audio. If you need to adjust the cursor position, you can press the Comma or Period keys (which move the cursor backwards or forwards one second, respectively), or the Left or Right arrow keys (which move the cursor by a small amount backwards or forwards, respectively; the exact amount of the change depends on how far the interface is zoomed in)
- Press Ctrl+I (or Cmd+I) to split the track (this marks the beginning of the quote)
- Press Space to start the playback
- Press P once the playback has reached the end of the quote (“articulating and executing speech.”) to pause the playback
- Press [ (the left bracket key) to move the cursor position to the place where the playback was paused
- Press Space to stop the playback
- Press Ctrl+I (or Cmd+I) to split the track (this marker marks the end of the quote)
- Press Alt+Comma (or Option+Comma) twice to select the clip containing the preview quote
- Press Ctrl+C (or Cmd+C) to copy the clip containing the preview quote
- Press Ctrl+Shift+A (or Cmd+Shift+A) to deselect all tracks
- Highlight the preview quote track using the relevant arrow key (Up or Down)
- Press Enter to select the preview quote track
- Press the J key to move the cursor to the beginning of the preview quote track
- Press the Period key 3 times to move the cursor 3 seconds to the right
- Press Ctrl+V (or Cmd+V) to paste the preview quote into the preview quote track
Tip
If you are listening to the main content of an interview and come across sections that you find would work as a potential preview quote, it is useful to write them down (as well as the times when they occur) as you hear them. That way, once you’ve listened to the main content, you have a list of possible preview quotes to choose from.
Backing up the project
Now that the tracks are aligned, we will be applying some finishing touches by applying some effects and shortening the music tracks. However, before we do this, it is a good idea to back up the project. In Audacity, effects are destructive, which means that if you apply them and close the project, then they can’t be undone when you reopen the project. As a result, backing up the project is useful so that if we want to go back to a previous stage of the project before the effects were applied, we don’t have to start over from the beginning.
To back up the project, go to the File menu and then to Save Project > Backup Project. Give the file a name indicating it’s a backup (like “Project backup”) and save it.
Creating a reusable template
As in the last chapter, we will create a reusable template based on the episode structure we have created so far, and this reusable template will consist of any audio content that is shared between episodes. Since the edits we will be making in the next section are destructive and episode-specific, we will have to create the reusable template now, before we make those edits.
To create our reusable template, we can create a copy of the current project by going to the File menu in the upper-left-hand corner, clicking on Save Project, Backup Project, navigating to the folder you want to save the template it, typing in the file name (in this case, we’ll use the file name “Reusable template”), and hitting the Enter button or pressing Save.
A few modifications have to be made to the reusable template to ensure that there is consistency between episodes, but we will return to that later.
The outro music
We have to make a few changes to the outro music, since it is currently too long (over a minute) and too loud (it overpowers the guest and host). The outro music should be quieter when the preview quote is playing, it should last several seconds after the end of the spoken outro, and the end of the outro music should fade out rather than stop abruptly.
To shorten the outro music by deleting the last 10 seconds of the outro music:
- Mouse:
- Click a point in the outro music that is about 10 seconds after the end of the spoken outro
- One way of doing this is to use the timeline (which is located above the top track) to see at what time where the spoken outro ends, and what point is 10 seconds after that time
- Another way is to select the point in the outro music that coincides with the end of the spoken outro (a yellow line will show up when this is the case), then drag the cursor to the right while holding Shift until the selection is 10 seconds long, then pressing the Right arrow key once to move the cursor to the end of the selection. You can check the length of the selection by looking at the selection toolbar at the bottom of the interface. The selection toolbar contains a dropdown menu with four options: Start and End of Selection, Start and Length of Selection, Length and End of Selection, and Length and Center of Selection. If one of the options containing the word “length” is selected, then one of the counters below it will show the length of the selection.
- Press Ctrl+I (or Cmd+I) to split the clip at the point you selected in Step 1
- Click the handle bar of the clip on the right
- Press Ctrl+K (or Cmd+K)
- Click a point in the outro music that is about 10 seconds after the end of the spoken outro
- Keyboard:
- Press Ctrl+Shift+A (Cmd+Shift+A) to deselect all tracks, or go to the Select menu and select None
- Highlight the spoken outro track using the relevant arrow key (Up or Down)
- Press Enter to select the spoken outro track
- Press K to move the cursor to the end of the spoken outro
- Press Ctrl+Shift+A (Cmd+Shift+A) to deselect all tracks, or go to the Select menu and select None
- Highlight the outro music track using the relevant arrow key (Up or Down)
- Press Enter to select the outro music track (the cursor will be at the time set in Step 4)
- Press ] (the right bracket key) to open the Set Right Selection Boundary dialog (‘m’ in the dialog means ‘minutes,’ and ‘s’ means ‘seconds’)
- Press the Right arrow key twice to move to the tens-of-seconds positions
- Press the Up arrow key once to increase the number in the tens-of-seconds position by 1 (this will change the boundary position to be 10 seconds further forward)
- Press OK
- Press the Right arrow key once to set the cursor position to the right edge of the currently selection portion of the outro music
- Press Ctrl+I (or Cmd+I) to split the outro music track into two
- Press Alt+Comma (or Option+Comma) to select the clip on the right
- Press Ctrl+K (or Cmd+K) to delete the clip you have selected
Now that the outro music has been shortened, we can apply the Auto Duck effect. The Auto Duck effect automatically lowers the volume of parts of a track that occur at the same time as audio in the track below it (called the control track). This means that we can use the Auto Duck effect to make it so that the outro music is quiet when the host or guest is speaking, but returns to normal volume after they have finished speaking. This way, the outro music will automatically shift from the background to the foreground.
In the case of our current project, the audio that we want to use for the Auto Duck effect is divided among two different tracks (the tracks of the host and guest), but the Auto Duck effect only works with a single control track. This means that if we move the outro music track so that it is right above the tracks of both speakers and apply the Auto Duck effect, the music’s volume will only be affected by the track that is right below it (the control track) rather than both of the main content tracks. This is not ideal, since it means that the music will be too loud when one of the main content tracks is playing.
As a result, we will need to create a track that combines the content of both speakers’ tracks, and use that mixed track as a control track when we apply the Auto Duck effect to the outro music. To do this:
- Mouse:
- Click on one of the main content tracks (the host’s track or the guest’s track)
- While holding Shift, click the other main content track
- Click on the Tracks menu and go to Mix > Mix and Render to New Track
- Keyboard:
- Press Ctrl+Shift+A (Cmd+Shift+A) to deselect all tracks, or go to the Select menu and select None
- Highlight one of the main content tracks (the host’s track or the guest’s track) using the relevant arrow key (Up or Down)
- Press Enter to select the main content track you have just highlighted
- Highlight the other main content track (the host’s track or the guest’s track) using the relevant arrow key (Up or Down)
- Press Enter to select the main content track you have just highlighted
- If the Full set of shortcuts is enabled, press Ctrl+Shift+M (or Cmd+Shift+M) to apply the “Mix and Render to New Track” function to the main content tracks; this will create a new track that contains the content of both the tracks you have selected
- If the Full set of shortcuts is not enabled, you can also apply this function by going to the Tracks menu, then to Mix > Mix and Render to New Track
There should now be a new track called “Mix” that contains the audio from both the host’s track and the guest’s track.
To apply the Auto Duck effect to the outro music, with the Mix track serving as the control track:
- Mouse:
- While holding the Alt (or Cmd) key, click on the track control panel of the Mix track and drag it so that it is right below the outro music track
- Click on the handle bar of the first clip in the outro music track (it is the clip that overlaps with the Mix track)
- Click on the Effect menu
- Click on “Auto Duck…”
- Click OK
- Keyboard:
- Highlight the Mix track using the relevant arrow key (Up or Down)
- Press Shift+M to open the Mix track’s control panel menu
- Use one of the relevant Move functions (Move Track Up, Move Track Down, or Move Track to Bottom) to move the Mix track so that it is below the outro music track, if it isn’t already
- The function you will need to use will depend on the exact position of the outro music track. If you need to use the Move Track Up or Move Track Down function, you may need to apply it multiple times until the track is in the right position
- Press Ctrl+Shift+A (Cmd+Shift+A) to deselect all tracks, or go to the Select menu and select None
- Highlight the outro music track
- Press Enter to select the outro music track
- Press J to move the cursor to the beginning of the first clip in the outro music track
- Press Ctrl+Period (or Cmd+Period) to select the first clip to the right of the current cursor position (in this case, this will select the first clip in the outro music track)
- Open the Effect menu
- Select Auto Duck to open the Auto Duck dialog box
- Press the Enter key or the OK button to apply the Auto Duck effect
There are two more things we need to do: have the beginning of the outro music fade in, and have the end fade out. This way, the music won’t start and end abruptly.
To apply the Fade In effect to the beginning of the outro music:
- Mouse:
- Select the first few (1-3) seconds of the outro music
- Click on the Effect menu
- Click on Fade In
- Keyboard:
- Press Ctrl+Shift+A (Cmd+Shift+A) to deselect all tracks, or go to the Select menu and select None
- Highlight the outro music track using the relevant arrow key (Up or Down)
- Press Enter to select the outro music track
- Press J to move the cursor to the beginning of the outro music
- Press the Period key twice to move the cursor two seconds to the right
- Press Shift+J to select everything to the left of the current cursor position (in this case, this will select the first two seconds of the outro music)
- Open the Effect menu
- Select Fade In
To apply the Fade Out effect to the end of the outro music:
- Mouse:
- Select the last few (1-3) seconds of the outro music
- Click on the Effect menu
- Click on Fade Out
- Keyboard:
- Press Ctrl+Shift+A (Cmd+Shift+A) to deselect all tracks, or go to the Select menu and select None
- Highlight the outro music track using the relevant arrow key (Up or Down)
- Press Enter to select the outro music track
- Press K to move the cursor to the beginning of the outro music
- Press the Comma key twice to move the cursor two seconds to the right
- Press Shift+K to select everything to the left of the current cursor position (in this case, this will select the last two seconds of the outro music)
- Open the Effect menu
- Select Fade Out
Now that the Auto Duck effect has been applied and the outro has been finalized, we don’t need the Mix track anymore, so delete it by selecting the Mix track, going to the Tracks menu and selecting “Remove Tracks.” Alternatively, you can click the “x” in the track control panel of the Mix track.
The intro
For the intro, we have to do two things:
- Apply the Auto Duck effect to the music so that it is quieter when the preview quote is playing
- Apply the Fade Out effect to the end of the intro music so that it doesn’t end abruptly
To apply the Auto Duck effect, the track with the intro music should be immediately above the preview quote track, which will serve as a control track for the effect. To move the intro music track and apply the Auto Duck effect:
- Mouse:
- While holding Alt (or Cmd), click the control panel of the intro music track and drag the track up or down until it is above the preview quote
- Click the handle bar of the intro music to select the intro music clip
- Click on the Effect menu
- Click on Auto Duck to bring up the Auto Duck dialog box
- Click on OK
- Keyboard:
- Highlight the intro music track using the relevant arrow key (Up or Down)
- Press Shift+M to open the intro music track’s control panel menu
- Use one of the relevant Move functions (Move Track Up, Move Track Down, or Move Track to Bottom) to move the intro music track so that it is above the preview quote track, if it isn’t already
- The function you will need to use will depend on the exact position of the intro music track. If you need to use the Move Track Up or Move Track Down function, you may need to apply it multiple times until the track is in the right position
- Press Tab to select the intro music clip
- Open the Effect menu
- Press Auto Duck
- Press Enter or the OK button to apply the Auto Duck effect
The intro music has now been auto ducked.
To apply the Fade Out effect:
-
- Mouse:
- Select the last few (1-3) seconds of the intro music
- Click on the Effect menu
- Click on Fade Out
- Keyboard:
- Press Ctrl+Shift+A (Cmd+Shift+A) to deselect all tracks, or go to the Select menu and select None
- Highlight the intro music track using the relevant arrow key (Up or Down)
- Press Enter to select the intro music track
- Press K to move the cursor to the beginning of the intro music
- Press the Comma key twice to move the cursor two seconds to the left
- Press Tab to select the second of the two clips in the intro music track
- Open the Effect menu
- Select Fade Out
- Mouse:
The intro music has now been auto ducked, and the end of it now fades out.
Loudness Normalization
One last effect that we can apply is Loudness Normalization, which can be applied to all of our tracks to make sure that they have roughly the same volume level. To apply the Loudness Normalization effect:
- Select all the tracks in the project by pressing Ctrl+A (or Cmd+A)
- Press the Effect menu
- Press “Loudness Normalization”
- Press “OK” in the dialog box that shows up
Now, we have a full podcast episode ready to be published.
Reusable templates
Let’s go back to the reusable template we created earlier. In order to minimize the amount of work we need to do in future episodes and in order to ensure consistency between episodes, we can add markers to indicate where clips should start or end, and we can also delete content that is different in each episode so that we don’t have to delete it every time we start working on a new episode.
First, we will split the intro music track so that we have a marker we can use to make sure that future preview quotes start at the exact same time in every episode. To do this:
- Mouse/Keyboard:
- Click the point in the intro music that coincides with the beginning of the preview quote (a yellow line will show up when you are hovering over it)
- Press Ctrl+I (or Cmd+I) to split the intro music clip at the point you have selected
- The marker created as a result of this will allow you to paste any future preview quotes at the exact same time each episode (specifically, at the time where the intro music has been split)
- Click the point in the intro music that coincides with the beginning of the main content (a yellow line will show up when you are hovering over it)
- Press Ctrl+I (or Cmd+I) to split the intro music clip at the point you have selected
- Keyboard:
- Press Ctrl+Shift+A (Cmd+Shift+A) to deselect all tracks, or go to the Select menu and select None
- Highlight the preview quote track using the relevant arrow key (Up or Down)
- Press Enter to select the preview quote track
- Press J to move the cursor to the beginning of the preview quote
- Press Ctrl+Shift+A (Cmd+Shift+A) to deselect all tracks, or go to the Select menu and select None
- Highlight the intro music track using the relevant arrow key (Up or Down)
- Press Enter to select the intro music track
- Press Ctrl+I (or Cmd+I) to split the intro music clip at the point you have selected
- Press Ctrl+Shift+A (Cmd+Shift+A) to deselect all tracks, or go to the Select menu and select None
- Highlight one of the main content tracks (the host’s track or the guest track) using the relevant arrow key (Up or Down)
- Press Enter to select the main content track you have highlighted
- Press J to move the cursor to the beginning of the main content
- Press Ctrl+Shift+A (Cmd+Shift+A) to deselect all tracks, or go to the Select menu and select None
- Highlight the intro music track using the relevant arrow key (Up or Down)
- Press Enter to select the intro music track
- Press Ctrl+I (or Cmd+I) to split the intro music clip at the point you have selected
Now, the intro music track has two markers that can help us with future episodes: one that marks the beginning of the preview quote, and one that marks the beginning of the main content. We can use these markers to align future preview quotes and main content tracks so that they start at the exact same points every episode.
The next thing we need to do is make sure that the reusable template includes audio that is shared between episodes, but excludes audio that is different each episode. In this case, the shared material is the intro and outro music, as well as the spoken outro. This leaves the main content and preview quote as the parts that should be removed from the reusable template (if we don’t delete them now, then we would have to do so every time we start working on a new episode).
In our case, there are three tracks we have to delete tracks: the host’s track, the guest’s track, and the preview quote track. This can be done as follows:
- Mouse:
- Click the “x” button on the track control panel for each track
- Alternatively, you can remove the host’s track, the guest’s track, and the preview quote track by clicking on each track while holding the Ctrl (or Cmd) key, going to the Tracks menu, and clicking “Remove Tracks”
- Click the “x” button on the track control panel for each track
- Keyboard:
- Press Ctrl+Shift+A (Cmd+Shift+A) to deselect all tracks, or go to the Select menu and select None
- Highlight the preview quote track using the relevant arrow key (Up or Down)
- Press Enter to select the preview quote track
- Highlight the host’s track using the relevant arrow key (Up or Down)
- Press Enter to select the host’s track
- Highlight the guest’s track using the relevant arrow key (Up or Down)
- Press Enter to select the guest’s track
- Open the Tracks menu
- Press Remove Tracks
We now have a reusable template we can use for future episodes with a similar format.
Other episode structures
Besides the structure in the example above, there are other equally valid structures that could be used for a podcast episode.
Lingthusiasm
One possibility is not to use a preview quote. One example is the structure used by Lingthusiasm (which you can hear, for example, in Episode 67), which has the following flow:
Technoculture
Another example is the Technoculture podcast. Episode 28 (which is about digital humanities) has the structure:
This differs from the structure used for the Lingthusiasm podcast in that there is no music separating the spoken intro and the main content. This can make the editing process simpler, since there are fewer transitions between sections to worry about.
Exercise
Below, you will find links to audio tracks for different parts of Season 3, Episode 4 of Some Stutter, Luh! Download them and import them into an Audacity project.
After you have imported the files into Audacity, align and edit the tracks in the project to create an episode structured like the episode in the tutorial above. Specifically, the sections of the episode should occur in the order intro music > preview quote > intro music > main content > spoken outro > outro music.
The intro music should fade out shortly after the beginning of the main content, and the outro music should start shortly before the end of the main content and end shortly after the end of the spoken outro. Both the intro music and outro music should be auto ducked.
For the preview quote, listen to the main content after you have aligned the music and main content clips, and select a part of the guest’s answer that you think would be a good preview of the episode content.
When you are done, use the self-assessment checklist below and compare your result to the audio file below the checklist. There is also a video available below the checklist that shows one possible way of aligning and editing the tracks.
Self-assessment checklist
Now that you have finished editing the episode, check to see if the following statements apply.
- The episode contains intro music that:
- Is auto-ducked
- Overlaps with a preview quote and the beginning of the main content
- Fades out shortly after the beginning of the main content
- The episode contains a preview quote
- The episode contains a main content section
- The episode contains a spoken outro
- The episode contains outro music
- The parts of the episode occur in the following order: intro music > preview quote > intro music > main content > spoken outro > outro music
Sources
- The materials in the tutorial are adapted from “Interview with Jesse Harris (Season 3, Episode 3),” which is by the Some Stutter, Luh! podcast. Creative Commons Attribution-NonCommercial-NoDerivatives 4.0 International License.
- The materials in the exercise are adapted from “Interview with Jessica Deluce (Season 3, Episode 4),” which is by the Some Stutter, Luh! podcast. Creative Commons Attribution-NonCommercial-NoDerivatives 4.0 International License.
- The intro and outro music used in the tutorial is “Hold on a Sec” by Bryan Teoh. CC0 1.0 Universal.
