
Prefer to watch and learn? Check out this video tutorial. NOTE: The assigned activity does not completely match this video tutorial.
Complete the following Practice Activity and submit your completed project.
For Word Practice 3, we will use Word to create a resume that will be used to apply for a Help Desk position at the NBCC Help Desk. Key skills in this practice are creating and modifying tables, and sharing documents online.
- Launch Microsoft Word. Click Blank Document.
- Show formatting marks and show the ruler.
- Save the document as FirstnameL_Word2 (example AynslieC_Word2), in your Word Folder.
- On the Insert Tab, in the Header and Footer group, Choose Footer, then Edit Footer.
- In the Header and Footer Tab, in the Insert Group, choose the arrow under Document Info. Add the file name to the footer. Exit the footer.
- At the top of your document, Insert a 2 X 4 table.
- To insert a table, navigate to the Insert Tab, Tables Group, and drag your cursor in the grid to create a table with two columns and four rows.
- Beginning with the first cell in the table, type each of the following:
-
- PROFESSIONAL OBJECTIVE [Press Tab]
- Desire a Help Desk Assistant position where I can use my expertise in providing desktop and application support to users. [Press Tab]
- QUALIFICATIONS [Press Tab]
- A results-oriented help desk specialist experienced in providing in-depth customer support. [Press Enter]
- Demonstrated ability in diagnosing problems. [Press Enter]
- Extensive end-user training experience. [Press Enter]
- Capable of working with a diverse customer base. [Press Enter]
- Experienced in different operating systems and applications. [Press Tab]
- In the third row, type WORK EXPERIENCE and press Tab.
- Using the Insert Text from File function, insert the text from Text_Word_Practice2 (downloaded file from Brightspace).
- To insert text from file navigate to the Insert tab and select the drop down arrow beside Object in the Text group.
- Remove the blank line at the end of the inserted text.
- In the fourth row, in the column to the left, type EDUCATION AND CERTIFICATIONS and press Tab.
- Type the following, pressing Enter at the end of each line except the last one:
-
- University of Youngstown, Youngstown, OH
- Bachelor of Science degree in Computing, 2020
- Microsoft Certified Solutions Expert (MCSE)
- CompTIA A+
- CompTIA Network+
- CompTIA Security+
- Select all the text in the cell to the right of QUALIFICATIONS, apply bullets, and decrease the indent.
- To apply bullets and decrease indent, navigate to the Insert Tab, Paragraph Group.
- Apply this format to the description of WORD EXPERIENCE using the Format Painter (located on the Home tab, Clipboard group)
- With the text selected in the QUALIFICATIONS description cell (right cell), double-click the format painter icon.
- Drag your mouse over the WORD EXPERIENCE description cell (right cell)
- Add bullets to the list in the text next to EDUCATION AND CERTIFICATIONS.
- Ensure the bullets align with the other bullets in the document.
- Increase the indent for the Bachelor of Science Degree.
- Drag the table vertical border between the two columns until the white arrow on the ruler is approximately 1.5 inches on the horizontal ruler.
- Select the text in the first column.
- On the Home Tab, in the Paragraph group, ensure all of the text in the first column is left aligned.
- With your cursor in the table, click the Layout Tab,
- In the Cell Size group, using the Width box down spin arrow, set the column width to 1.4 for the first column.
- Click Auto-fit and select Auto-fit Window.
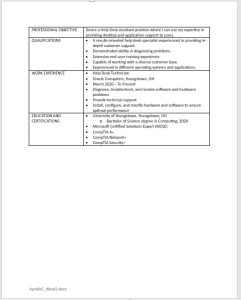
- Check to see whether your document looks like this
- Use the one-click Row/Column insertion button to insert a new row above EDUCATION AND CERTIFICATIONS.
- Hover near the left border above EDUCATION AND CERTIFICATIONS
- Click the plus sign when it appears
- In the left cell of the new row and type TECHNICAL SKILLS and press Tab.
- In the second column, type the following, pressing Enter at the end of each line, except the last one:
-
- Platforms: Windows 10, MacOS, Unix
- Applications: Microsoft Office 365, Norton/McAfee Anti-Virus, Norton Internet Security, Photoshop
- Strong knowledge of LAN and WAN technologies
- Solid knowledge of Oracle Help Desk system
- Apply bullets to the Technical Skills list. Ensure the bullets align with the other bullets in the document.
- In the top row of the table change the top and bottom cell margins to 0.04″.
- Cell margins are on the Layout Tab, Alignment Group.
- Remove any extra spaces or lines in the first row of the table.
- At the top of the document, insert a row above the first row.
- On the Layout Tab, in the Rows & Columns Group, choose Insert Above.
- Select the entire first row that you just added.
- On the Layout Tab, Merge the two cells in the top row.
- In the first row of the table type:
-
- Matt Smith [Press Enter]
- (867) 555-1012 [Press Enter]
- 1254 Success Way, Phoenix, AZ 85320 [Press Enter]
- msmith@pacifica.net[Press Tab]
Note: Pressing Tab would move to the next cell, whereas pressing
Ctrl + Tab moves within the cell.
Ctrl + Tab moves within the cell.
- Select Matt Smith and use the mini-toolbar to
- bold and italic and
- change the font size to 14.
- Select all of the text in the first row.
- On the Home tab, expand the paragraph settings of the Paragraph group and set Spacing Before and After to 0 pt.
- Remove any extra line spacing.
- With all of the text still selected in the first row, center all of the text.
- Beginning in the second row, italicize and bold all of the headings in the left-hand column.
- In the cell to the right of WORK EXPERIENCE,
- italicize and bold the job title ‘Help Desk Technician’.
- In the cell to the right of EDUCATION AND CERTIFICATIONS,
- bold University of Youngstown.
- Place cursor at line beginning with Bachelor,
- on the Home tab, expand the paragraph settings of the paragraph group and change the Spacing After to 12 pt.
- If necessary, deselect the Don’t add space between paragraphs of the same style box. Leaving this selected will result in no space being added.
- In the cell to the right of WORK EXPERIENCE, select Help Desk Technician and set the spacing to 12 pt. after.
- If necessary, deselect the Don’t add space between paragraphs of the same style box.
- Select the entire table. There are a few ways to do this:
-
- Click the cross hair indicator in the upper left hand corner of the table, or
- Start at the top of the table and click and drag to select the entire table, or
- Use the shortcut key CTRL + A
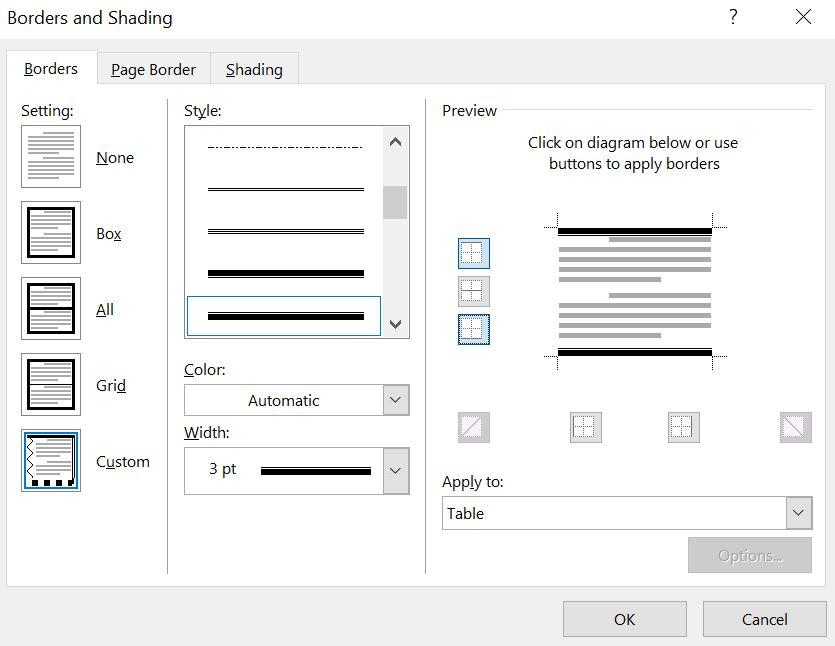
- Remove all the borders
- On the Table Design Tab, in the Border Group, click the arrow below Borders and select No Border.
- With the table still selected, on the Table Design Tab, in the Border Group, select Borders arrow and select Borders and Shading.
- In the Borders tab, select the “thick upper line and thin lower line” table style (ninth on list)
- Deselect the left and the right borders in the Preview section.
- Only the top of the table and the bottom of the table should have this border
- In the line beginning with (867) 555-1012, change the Spacing Before to 12 pt (found on Layout tab).
- In Backstage View, display the print preview under Print.
- Compare your documents to the image below.
- If necessary, exit Backstage view and make modifications.

- In Backstage View, under Info, show all properties and
- type in the tags box ‘resume’.
- Type your course name and course code (SAAL1869 Office Fundamentals) in the Subject box
- Be sure your name is in the Author box.
- Upload your file to the appropriate assignment box on Brightspace.
Media Attributions
- Practice It Icon by Jessica Parsons is licensed under a CC BY (Attribution) license
- Woman in black blazer by Anna Shvets is licensed under a Pexels License license
- Woman in wheelchair by Jordan Nicholson/Disability:IN is licensed under a CC BY-ND (Attribution NoDerivatives) license
